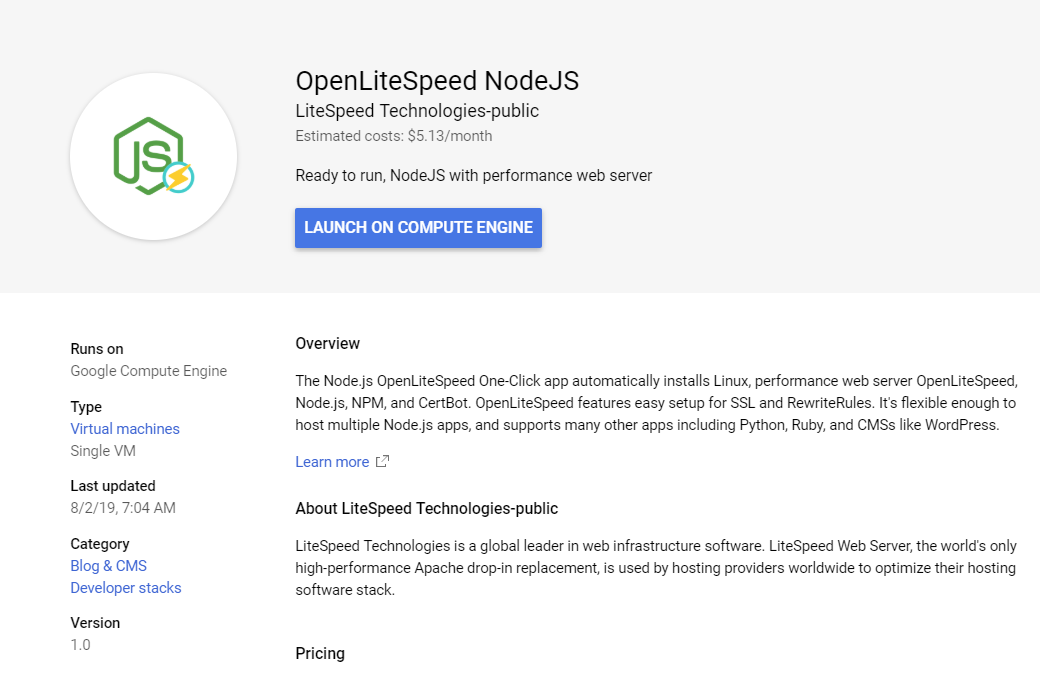
NodeJS
The OpenLiteSpeed Node.js One-Click app automatically installs performance web server OpenLiteSpeed, and Node.js. This image tends to be more than 4 times faster than Node.js with Nginx! OpenLiteSpeed features easy setup for SSL and RewriteRules. OLS is flexible and also supports Python and Ruby apps, as well as CMSs like WordPress.
Quick Start
Step 1.
DigitalOcean
Use the "OpenLiteSpeed Node.js 1-Click app" to create a Droplet with any plan you want. Click here to create an account and get a $100 Digital Ocean credit.
Google Cloud Platform (GCP)
- Login to the Google Cloud Platform and click Launch a VM instance on Compute Engine.
Amazon Web Services(AWS)
Method 1. Through Subscribe
- Subscribe to NodeJS
- Click Continue to Launch and Launch
Method 2. Through EC2 console
- Open the Amazon EC2 console
- Locate the product by searching for "Nodejs OpenLiteSpeed Cache" from AWS Marketplace
- Click Select,Continue,Preview and launch (the default is the most recent version)
Microsoft Azure Cloud (Azure)
- Log into the Azure Portal and click Image Link.
- Click the GET IT NOW and Create buttons
- Choose any server plan you'd like to use, and create the server
Linode
Use the "OpenLiteSpeed NodeJS StackScripts" to create a server with any plan you want. Click here to create an account
Alibaba Cloud
Use the "OpenLiteSpeed NodeJS" from Marketplace to create an ECS instance with any plan you want.
Step 2.
An interactive script that runs will first prompt you for your domain or subdomain.
You can press CTRL+C and continue to SSH. The prompt will open again the next time you log in, and will continue to do so until you finish the whole setup.
Please input a valid domain:
Please verify it is correct. [y/N]
Tip
Enter the root domain only, then the system will add both the root domain and the www domain for you..
You can also automatically apply Let's Encrypt SSL if your domain is pointed to this server already. Enter y and your email address to finish the process.
Do you wish to issue a Let's encrypt certificate for this domain? [y/N]
Please enter your E-mail:
Please verify it is correct: [y/N]
Do you wish to force HTTPS rewrite rule for this domain? [y/N]
Do you wish to update the system which include the web server? [Y/n]
Step 3.
Visit the default script by entering http://Server_IP on your browser and you should see Hello World from OpenLiteSpeed Node.js.
Start editing the Node.js file here
vim /usr/local/lsws/Example/html/node/app.js
Optional but recommended:
Update system software.
sudo apt-get update && sudo apt-get upgrade -y
Your system is installed and ready to use!
Components
The OpenLiteSpeed Node.js 1-Click Droplet installs several packages and performs other actions on your system.
Package Installation
| Component | Version |
|---|---|
| Linux | Ubuntu 18.04.1 |
| OpenLiteSpeed | Latest from LiteSpeedtech Repo |
| Node.js | Latest from APT |
| NPM | Latest from APT |
| Certbot | Latest from Certbot’s PPA |
Other Actions
- Enables the UFW firewall to allow only SSH (port 22), HTTP (port 80) and HTTPS (port 443) access.
Benchmark Comparison
Use the following command to test from a 4-CPU plan server(ab) to a 4-CPU plan server(DOMAIN)
ab -n 100000 -k -H "Accept-Encoding: gzip,deflate" -c 100 http://DOMAIN/
Requests per Second (The larger the number, the better)
| Nginx+PM2 | Openlitespeed |
|---|---|
| 2600 | 12000 |
How to Access the Installed Software
From a terminal on your local computer, connect to the server as root, like so:
ssh root@use_your_server_ip
AWS
ssh ubuntu@use_your_server_ip
Be sure to substitute the server’s public IP address for use_your_server_ip.
Web Server Control Panel Access
Get the WebAdmin admin password:
cat .litespeed_password
GCP
cat /home/ubuntu/.litespeed_password
Visit https://use_your_droplet_ip:7080 to access WebAdmin in a browser.
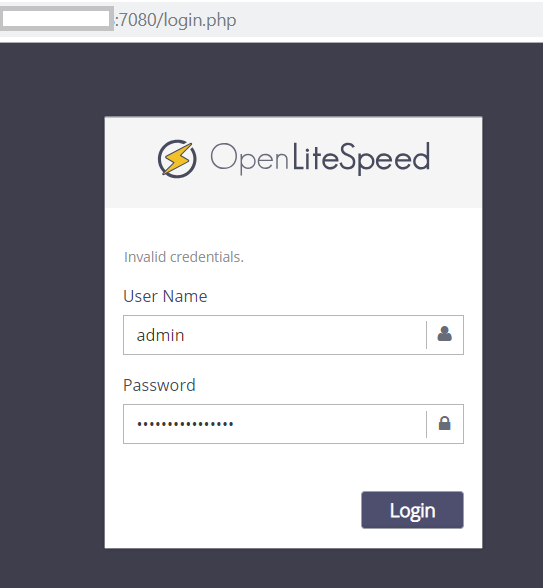
By default, WebAdmin uses port 7080. To allow access to 7080 from your IP(e.g. 1.2.3.4):
ufw allow from 1.2.3.4 to any port 7080
ufw allow 7080
ufw delete allow 7080
Optional Setup
Enable HTTPS
Setting up an SSL certificate enables HTTPS on the web server, which secures the traffic between the server and the clients connecting to it. Certbot is a free and automated way to set up SSL certificates on a server.
Step 1. Register Domain
To use Certbot, you’ll need a registered domain name and DNS records:
-
An A record from the domain (e.g.,
example.com) to the server’s IP address -
An A record from the domain prefaced with
www(e.g.,www.example.com) to the server’s IP address.
Step 2. Add Domain to Listener
Navigate to OpenLiteSpeed Web Server WebAdmin > Listeners, and add Your Domain to HTTP/HTTPS.

Step 3. Certbot
Once the DNS records are set up, you can generate the SSL certificate. Be sure to substitute the correct domain name in the following command:
certbot certonly --webroot -w /var/www/html/ -d example.com -d www.example.com
/etc/letsencrypt/
Step 4. Set SSL for HTTPS
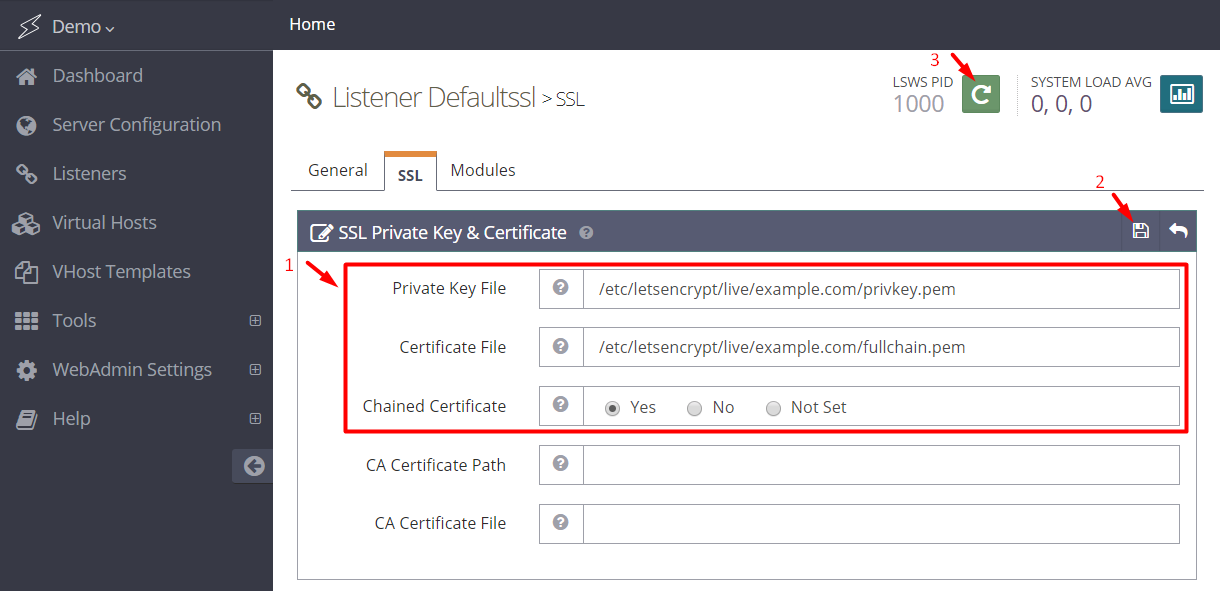
Navigate to OpenLiteSpeed Web Server WebAdmin > Listeners > SSL, and edit the following three items:
- Private Key File =
/etc/letsencrypt/live/example.com/privkey.pem - Certificate File =
/etc/letsencrypt/live/example.com/fullchain.pem - Chained Certificate =
Yes
Save and perform a Graceful Restart.
Now your server should support TLS1.1, TLS 1.2, and TLS 1.3.
Step 5. Redirect HTTP to HTTPS
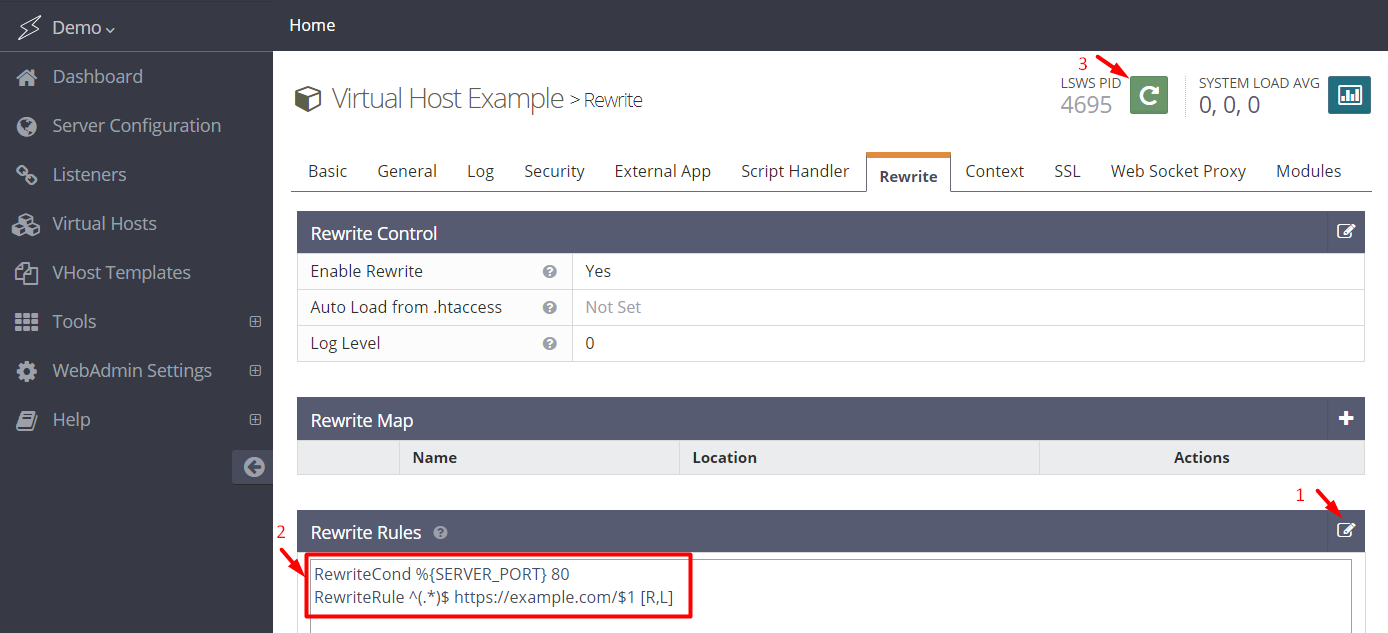
HTTPS traffic on port 443 is already allowed through the firewall. After you set up HTTPS, you can optionally rewrite all HTTP traffic to HTTPS.
Add the following rules to OpenLiteSpeed Web Server WebAdmin > Virtual Hosts > Rewrite > Rewrite Rules
RewriteCond %{SERVER_PORT} 80
RewriteRule ^(.*)$ https://example.com/$1 [R,L]
Method for Uploading Files
You can serve files from the web server by adding them to the web root using SFTP or other tools.
Frequently Asked Questions
How do I Reset my Web Server WebAdmin Password?
If you forget your password, you may run the following command to reset it:
/usr/local/lsws/admin/misc/admpass.sh
It will ask for the WebAdmin username, which should be admin. Then, enter your new password.
How do I Create Additional Virtual Hosts?
Auto Setup via Script
This method will automatically set up Listener/VirtualHost/Let's Encrypt/Force SSL/WordPress.
Interactive mode
wget https://raw.githubusercontent.com/litespeedtech/ls-cloud-image/master/Setup/vhsetup.sh
chmod +x vhsetup.sh
bash vhsetup.sh/bin/bash <( curl -sk https://raw.githubusercontent.com/litespeedtech/ls-cloud-image/master/Setup/vhsetup.sh )CLI mode
wget https://raw.githubusercontent.com/litespeedtech/ls-cloud-image/master/Setup/vhsetup.sh
chmod +x vhsetup.sh
bash vhsetup.sh -D www.example.com -LE admin@example.com -F -W/bin/bash <( curl -sk https://raw.githubusercontent.com/litespeedtech/ls-cloud-image/master/Setup/vhsetup.sh ) -D www.example.com -LE admin@example.com -F -W-
Please be sure that your domain is already pointing to the server when using
-LE YOUR_EMAIL -F -
Please be sure that your environment has php/sql service/sql root password when using
-Wfor WordPress CMS installation
Manual Setup
By default, OpenLiteSpeed has an example virtual host already created. You can create more virtual hosts if you like. See Create Virtual Hosts on OpenLiteSpeed.
How do I Create Additional Apps by Context?
How do I Change the Node.js Startup File?
If you want to change the default startup file name from app.js to node.js, just update the Context and set Startup File = node.js.
How do I upgrade NodeJS to latest stable version
Install NodeJS by using n module
sudo n stable
     install : node-vX.X.X
       mkdir : /usr/local/n/versions/node/X.X.X
       fetch : https://nodejs.org/dist/vX.X.X/node-vX.X.X-linux-x64.tar.gz
################################################################################## 100.0%
   installed : vX.X.X
ln -sf /usr/local/n/versions/node/X.X.X/bin/node /usr/bin/node
How do I use an Express app on this image?
Setting up an Express app is easy. First, install the Express.js module:
npm install express --save
Then, change your startup file (app.js) from a NodeJS program to an Express JS program:
const express = require('express')
const app = express()
const port = 3000

app.get('/', (req, res) => res.send('Hello World from OpenLitespeed Express JS!'))

app.listen(port, () => console.log(`Example app listening on port ${port}!`))
Finally, restart OpenLiteSpeed:
service lsws restart
And you're done!
API Creation
DigitalOcean
In addition to creating a Droplet from the Openlitespeed NodeJS 1-Click application using the control panel, you can also use the DigitalOcean API.
The following example creates an Openlitespeed NodeJS 18.04 Droplet called “My-Droplet” in the NYC3 datacenter, with 1 GB RAM:
curl -X POST "https://api.digitalocean.com/v2/droplets" \
    -d'{"name":"My-Droplet","region":"nyc3","size":"s-1vcpu-1gb","image":"openlitespeed-node-18-04"}' \
    -H "Authorization: Bearer $TOKEN" \
    -H "Content-Type: application/json"
AWS
In addition to creating an instance from the WordPress with LiteSpeed Cache using the AWS Management Console, you can also use the AWS Command Line Interface.
The following example creates an t2.micro Instance with WordPress+LiteSpeed Cache AMI:
Please replace XXX to your own settings.aws ec2 run-instances --image-id ami-0f6425e614db3906f \ --subnet-id subnet-XXXXXXX \ --security-group-ids sg-XXXXXXXXXXXXXX \ --count 1 \ --instance-type t2.micro \ --key-name XXXXXX \ --query "Instances[0].InstanceId"
GCP
Get the exact name of the NodeJS image from LiteSpeed's project, gc-image-pub:
gcloud compute images list --project=gc-image-pub --filter="name ~ 'openlitespeed nodejs'"
Create an instance, replacing INSTANCE_NAME with the name of your choice, and IMAGE_NAME with the name obtained from the previous command:
gcloud compute instances create INSTANCE_NAME --image-project=gc-image-pub --image=IMAGE_NAME
Azure
The first time you launch, you may need to accept the marketplace terms using the following command:
Find the release version you prefer:Get-AzureRmMarketplaceTerms \ -Publisher "litespeed_technologies" \ -Product "openlitespeed-nodejs" \ -Name "openlitespeed-nodejs" \ | Set-AzureRmMarketplaceTerms -AcceptLaunch VM from that image:az vm image list \ --location westus \ --publisher litespeed_technologies \ --offer openlitespeed-nodejs \ --all \ --output tableaz vm create \ --resource-group your-group \ --image litespeed_technologies:openlitespeed-nodejs:openlitespeed-nodejs:1.0.0 \ --name myVM \ --admin-username azure
Feel free to replace resource-group, image version, name, admin name, --generate-ssh-keys and more options with your own preferences.
Note
This request, like any other request that makes a change to your account, requires that your token has “write” scope assigned to it.