About LSCache for WordPress
LiteSpeed Cache can be a great way to maximize your website's speed using just the default configuration, but there is a lot going on begind the scenes. If you would like to better understand caching in general, and LiteSpeed Caching for WordPress in particular, this guide will help.
As of this writing, the latest version of the LSCWP plugin is 2.9.8. All content is current as of that version. We do intend to keep this guide up to date as features are added and changed. If you notice any discrepancies, please contact us at support[at]litespeedtech[dot]com so we may correct them.
What is caching?
Caching is a method of storing a snapshot of data at a given point. Caching is used in situations where the snapshot is more efficient to serve than the original content would be.
Caching may be implemented for two types of data: static and dynamic.
Static data refers to CSS, Javascript, images, and other types of content that is served as-is and is understood natively by the browser. Static files tend to make up the bulk of a website's size. As static data is usually browser-parsed, all the server needs to do is be a download medium for the files. All of the understanding of the static data will be handled by the browser. Caching of static files is often handled at the browser level to minimize the impact of transferring website pages.
Dynamic data, on the other hand, refers to content that must be processed and generated into a static file format (usually HTML) so that the browser may understand it. In a WordPress environment, in response to a page request, the server must first parse PHP, fetch the data from MySQL, and finally generate static content in the form of HTML so that the browser may understand it. This process is highly resource-intensive. Too many requests for dynamic content can take down your server. So, caching of dynamic data is critical for conserving server resources.
LiteSpeed Cache is a server-side page cache for dynamic content.
How does it work?
To understand why caching is important, it is first helpful to understand how it works.

User Request
A user sends a request by visiting the website URL in the browser.
CDN (Optional)
If a CDN is configured on the website for caching static or dynamic data, the cached data will be served from the CDN itself. The request will not go the server, unless there is no cached content available.
Some CDNs cache only static data, while some CDN's like LiteSpeed's QUIC.cloud also cache dynamic data. In this case, assuming the site is fully cached, no requests will ever go to the server. This decreases the server load dramatically, while simultaneously increasing the website's speed.
Server Cache Manager
If there is no CDN Configured or the CDN does not have cache for the requested data, it will then query the server cache manager. If the content is cached at the server level, then it will serve the request from the cache manager itself, without troubling PHP or MySQL.
PHP and MySQL
Lastly, if none of the cache intermediaries have any data, the content will be processed through PHP and MySQL. This will require resources to first understand the request sent by the user, process the parameters, compile some code, fetch some data from MySQL, parse a response and then send it back to the user.
If caching is enabled, the moment PHP and MySQL parse the page content, it will be stored by the server cache manager and the CDN (if set up for dynamic cache). Then, the next time that same content is requested, it will be served quickly from the cache instead of going through PHP and MySQL again. As mentioned, PHP and MySQL are resource-intensive.
Why is caching important?
The ability to avoid invoking costly processes such as PHP and MySQL is what makes caching very important for your website.
Prepare for Installation
Before installing, and activating the LiteSpeed Cache plugin, ensure that all other cache or optimization plugins are removed from your WordPress installation. LiteSpeed Cache is a battle-tested plugin and has excellent reviews. It does everything very well, so you shouldn't need any other plugin.
If you do choose to use another plugin in conjuction with LSCache, do not duplicate any features between the plugins. For example, if you're caching with LSCache, disable caching in the other plugin's settings. Or, if you're using the other plugin for CSS/JS Minification, disable those features in LSCache. If you're unsure, it's safest just to uninstall the other plugin.
Optimization is not an exact science. And for that reason, if you choose to change the plugin's default settings, you should test your website with every change you make. Conflicts may be introduced at any stage, so it's highly recommended that you make sure the website is loading correctly after each optimization is applied. It's not advisable to enable all options inside the plugin at the same time, as that makes troubleshooting unnecessarily complicated.
Install and Activate the Plugin
The first step in optimizing your WordPress site is to install and activate the LSCache plugin. Often installation and activation is the only step you might take with a new plugin. If all you wish to do is caching, LSCache's out-of-the box configuration should work for most sites without any manual tweaking.
Tip
Some hosting providers auto-install LiteSpeed Cache on their clients' WordPress sites. If this is the case for you, verify that the latest version is installed, and move on to the next step.
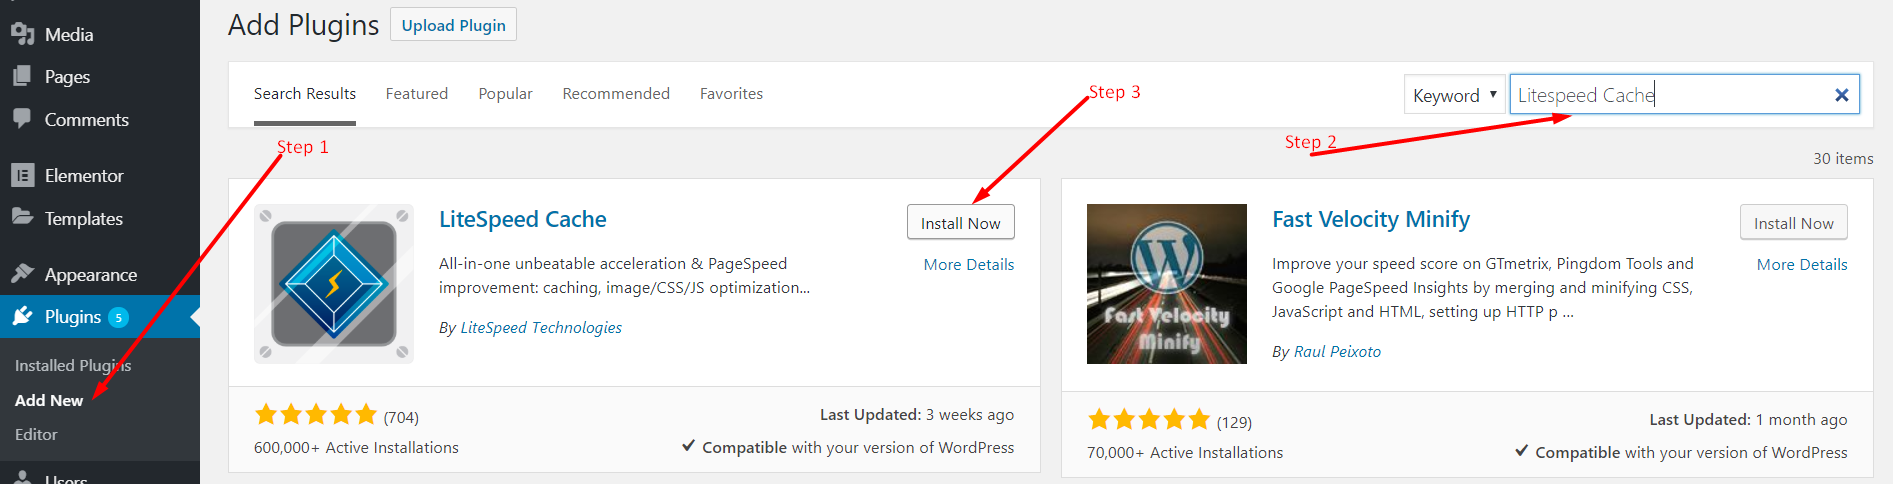
To install the plugin, log into your WordPress Dashboard, navigate to Plugins > Add New, enter LiteSpeed Cache in the search box on the right, and then click the Install Now button. That latest version of the plugin will automatically be downloaded and installed. The button will change to Activate. Press the button to activate LSCache.
If you'd prefer to install LSCache via zip file, you may download it from here, install manually, and activate.
Both installation methods are equal, so you may choose whichever one you prefer.
And that's it! Installation is complete.
Know Your Web Server
While the LiteSpeed Cache plugin for WordPress carries the LiteSpeed name, it can also be used with other web servers. The functionality when used with a non-LiteSpeed server is limited. Generally speaking, any function that is not a server-level cache function may be used with any web server (LiteSpeed, nginx, Apache, etc.). Cache functions, though, require OpenLiteSpeed, LiteSpeed-powered hosting, QUIC.cloud CDN, or a commercial LiteSpeed product.
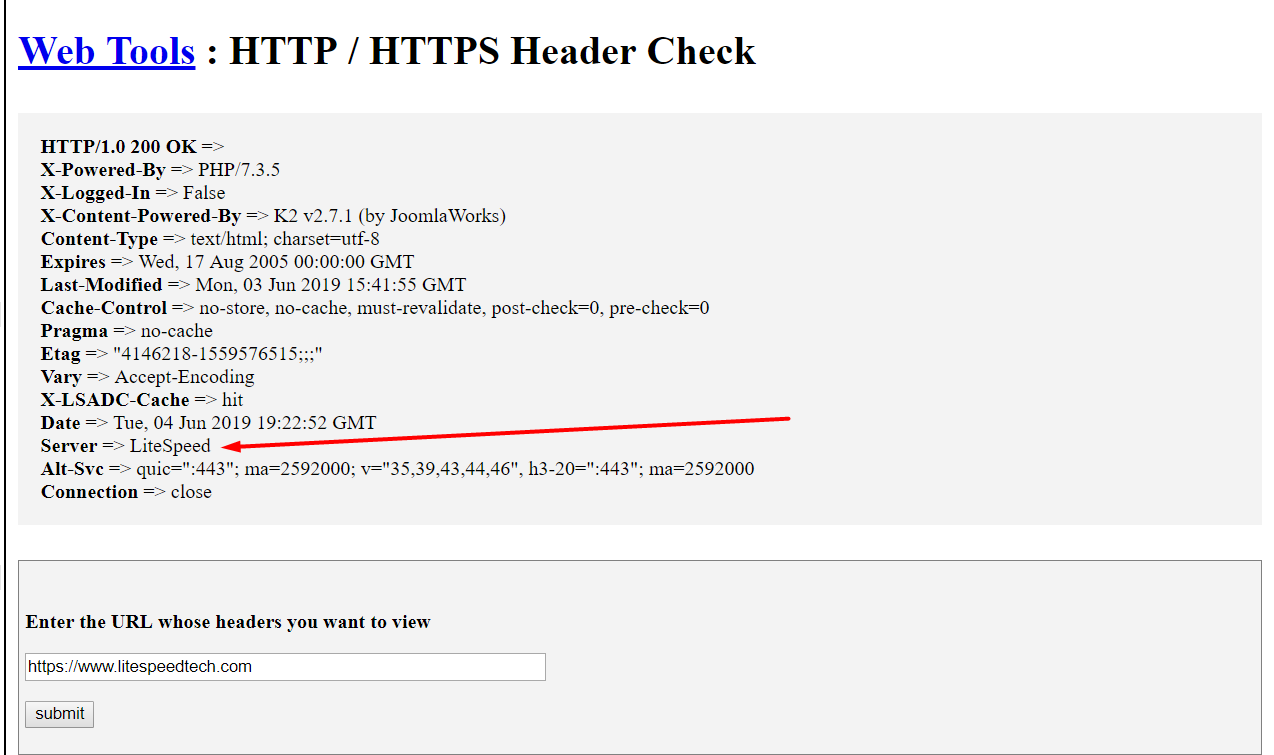
To find out which web server you're using, you can use this tool.
Enter your website's URL, and you'll see something like this:
Tip
Cloudflare is not a web server, it is a reverse proxy. If your web server is displayed as Cloudflare, you can disable Cloudflare for a moment, check the tool again, and see the actual web server that is powering your site. Most WordPress sites use LiteSpeed, Apache or Nginx.
If you're still unsure which web server you're using, please consider asking your hosting provider.
Learn More
Now that you have installed and activated the LiteSpeed Cache plugin, you should be good to go. If you wish to change any settings, you can visit our wiki for information about each LiteSpeed Cache setting.
Coming soon: Troubleshooting and Optimization Guide. Stay tuned.