Onboarding
Litespeed's QUIC.cloud CDN is a new way to supercharge your website.
QUIC.cloud, an intelligent cache CDN based on LiteSpeed Cache, is the only CDN service that can accurately cache dynamic pages (pages that can change frequently). LSCache for WordPress knows when to automatically purge and sync data in QUIC.cloud, giving it the upper-hand on all other CDN providers. Users can now provide anyone across the globe access to their sites in less than 100ms!
After reading through this tutorial, if there is something you do not understand, please let us know by sending an email to support[at]litespeedtech.com.
Preparation
If you are not sure about how the DNS works, check out our DNS Primer.
You will need to be logged into your WordPress admin and your DNS management page.
Step 0: Prepare your DNS
It is better to have your DNS set up first to simplify the transition to QUIC.cloud.
Tip
The base domain, e.g. example.com is known as the Root or Apex Domain. All other usages of this domain such as sub.example.com or www.example.com are subdomains.
If you are adding the root domain to QUIC.cloud refer to the following section. If you are adding a subdomain, refer to the subsequent section.
Adding the Root(Apex) Domain
QUIC.cloud requires that your DNS maps your domain to a domain provided during setup. This means that your DNS provider must support domain to domain mapping for the root domain.
Warning
This is not a standard feature. If you are unable to set up your DNS in this manner, you must switch to a DNS provider that is capable of this feature or reconfigure your WordPress' primary accessor to use www., e.g. www.example.com and follow the subdomain instructions. We are working to provide a better option, but that is a limitation of QUIC.cloud. An example DNS provider that is capable of this feature is CloudFlare's DNS.
The following instructions have screenshots from the CloudFlare DNS manager.
- Take a screenshot of your current configurations. Keep this as a reference in case things go wrong, so you have something to go back to.
- Check what your TTL value is and adjust it to the smallest value possible (if not already). You will need to wait until the old DNS records expire before you can use QUIC.cloud. After the old value expires, every record should be using the new value. Example: previous value: 1 hour, new value: 2 minutes. If it is 3pm when you change the value to 2 minutes, you must wait until 4pm to be sure that all the records now use the 2 minute value.
-
(Optional) If you wish to use both the root domain and the
www.subdomain:
Create a CNAME record pointingwww.to your root domain: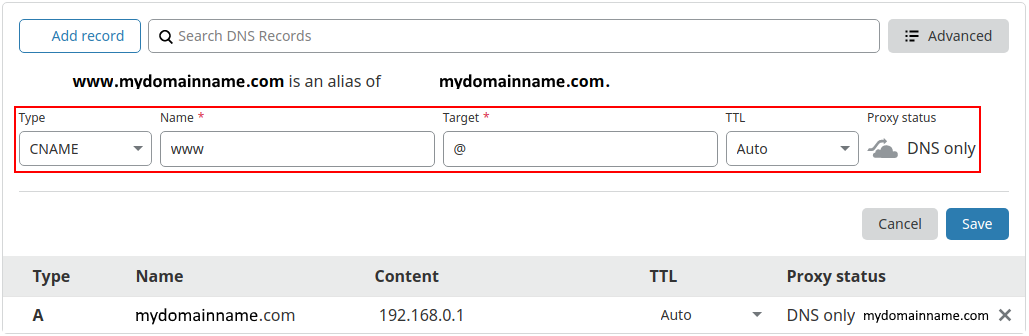
If you have a
www.record already, edit that to look like the above screenshot.
The net result is thatwww.example.comwill target the same server asexample.com. -
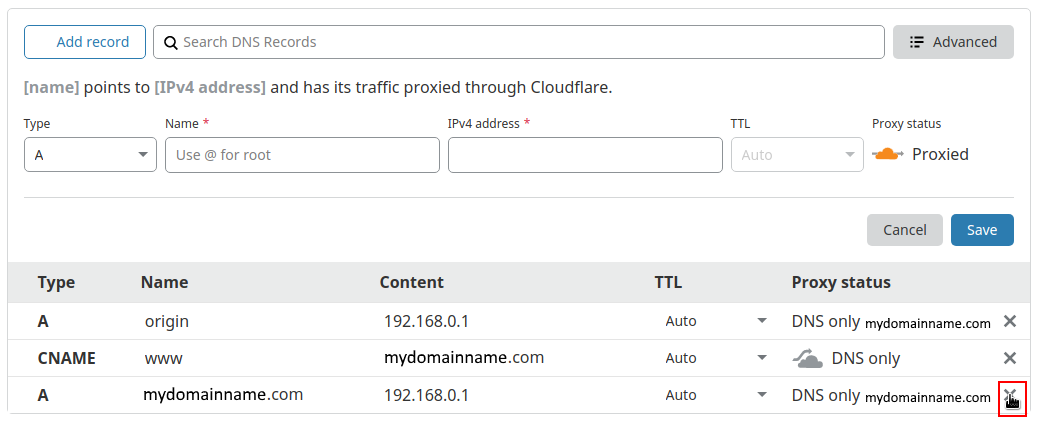
Create an A record for a random subdomain that points to your origin IP. For example,
origin.example.com.
-
Convert your current record for
@to a CNAME record targeting the subdomain you created in step 4.
Deleting the root domain record:Tip
The below screenshots are for deleting an A record and adding a CNAME record. If your current record is a CNAME record or your DNS Manager allows changing record types, you can just edit the record.
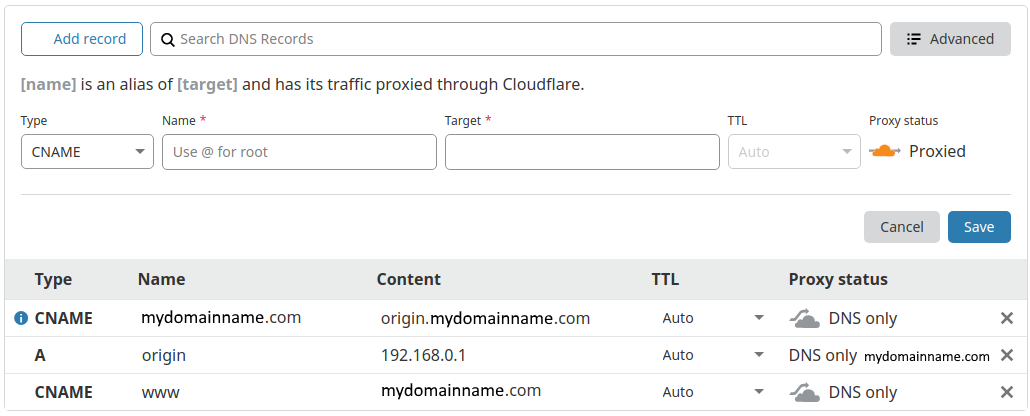
Setting the CNAME record for the root domain:
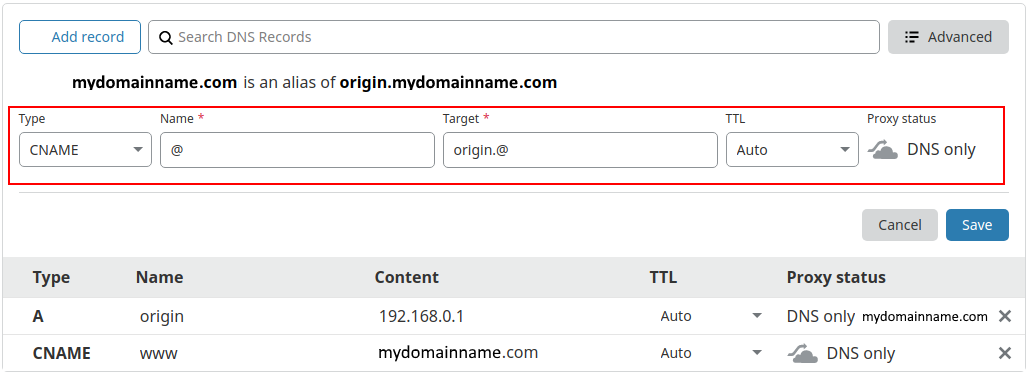
-
Make sure that your site is still accessible as is. Here are some ways to test.
Tip
If you are using CloudFlare DNS, ensure that the cloud is set to "Grey" (this means you are not actually using Cloudflare for anything other than the DNS).
After performing the above steps, the following should be true:
- Your site is still accessible. Nothing should have changed.
- If you performed step 3, your
www.subdomain should also point to your current IP. Refer to how to check the DNS - The random subdomain should also target the same IP.
If any of the above are not true, review your DNS configurations and run through the steps again. One possibility is that the TTL for the old configuration has not expired yet. Make sure that the time has elapsed.
Adding the Subdomain
The following instructions have screenshots from the Digital Ocean DNS manager. The steps should be similar for your DNS provider.
- Take a screenshot of your current configurations. Keep this as a reference in case things go wrong, so you have something to go back to.
- Check what your TTL value is and adjust it to the smallest value possible (if not already). You will need to wait until the old DNS records expire before you can use QUIC.cloud. After the old value expires, every record should be using the new value. Example: previous value: 1 hour, new value: 2 minutes. If it is 3pm when you change the value to 2 minutes, you must wait until 4pm to be sure that all the records now use the 2 minute value.
-
If the subdomain points to the same origin server as the root domain, this step is not required.
Create an A record for a random subdomain that points to your origin IP. For example,origin.example.com.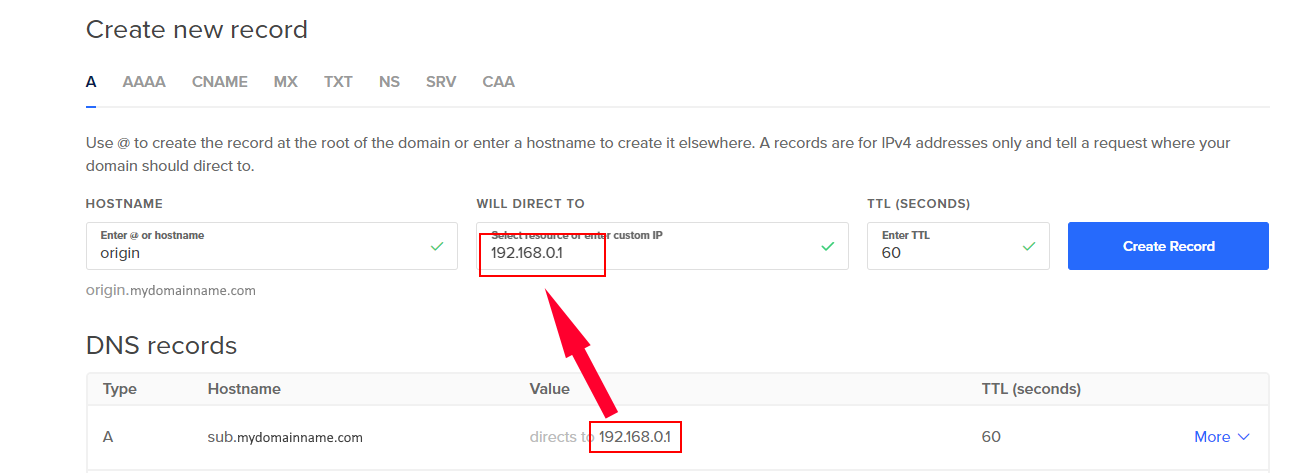
-
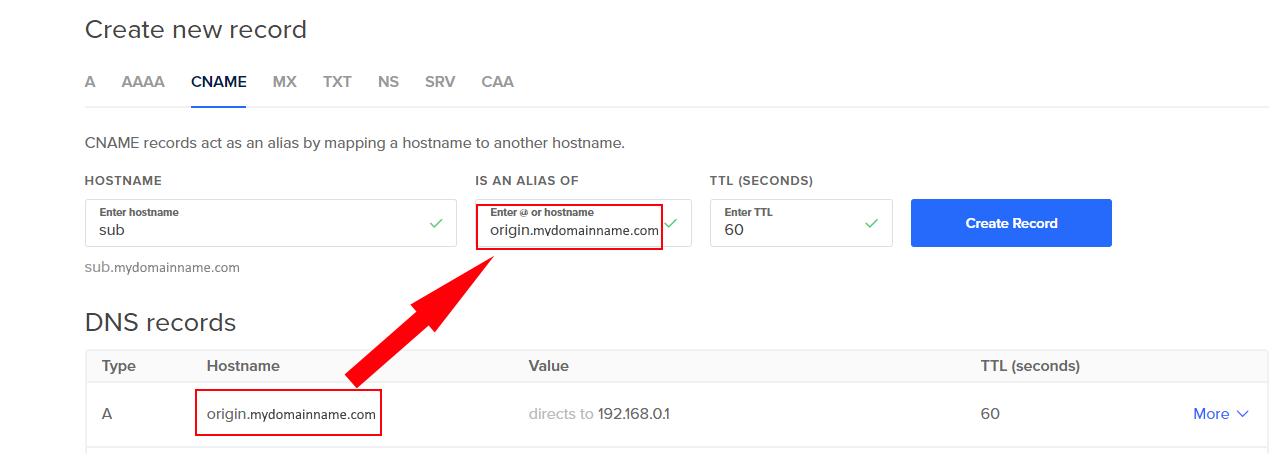
Convert your current record for the subdomain to a CNAME record targeting the subdomain you created in step 3. If you are using the root domain as the base, target that instead.
Tip
The below screenshots are for deleting an A record and adding a CNAME record. If your current record is a CNAME record or your DNS Manager allows changing record types, you can just edit the record.
Deleting the old record:
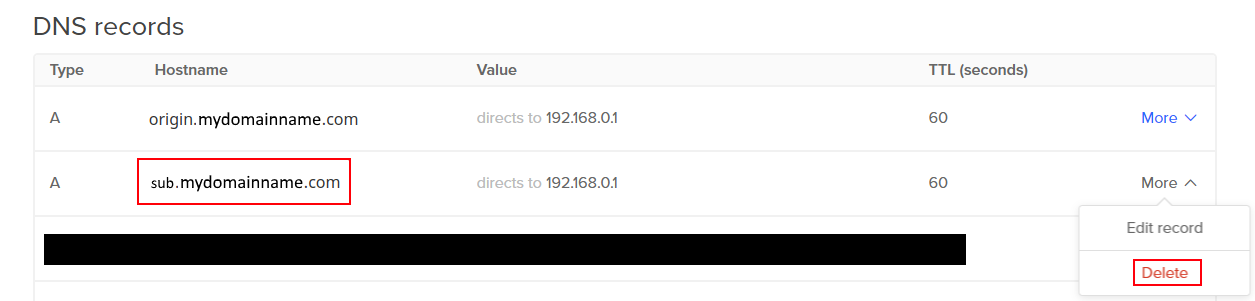
Adding the new record:
-
Make sure that your site is still accessible as is. Here are some ways to test.
Tip
If you are using CloudFlare DNS, ensure that the cloud is set to "Grey" (this means you are not actually using Cloudflare for anything other than the DNS).
After performing the above steps, the following should be true:
- Your site is still accessible. Nothing should have changed.
- The random subdomain should also target the same IP.

If any of the above are not true, review your DNS configurations and run through the steps again. One possibility is that the TTL for the old configuration has not expired yet. Make sure that the time has elapsed.
Step 1: Register
Register an account to access the service. This is a one-time process, and you can add multiple domains inside the same account.
Register here.
Enter your desired Email address and Password.
Check your email for a message from QUIC.cloud and confirm your account.
Proceed to the login page, enter your email and password to log in and access your dashboard.
Step 2: Add Your Domain to QUIC.cloud
-
In the Domains section, click on Add Domain.
2. Enter the domain you want to add to QUIC.cloud.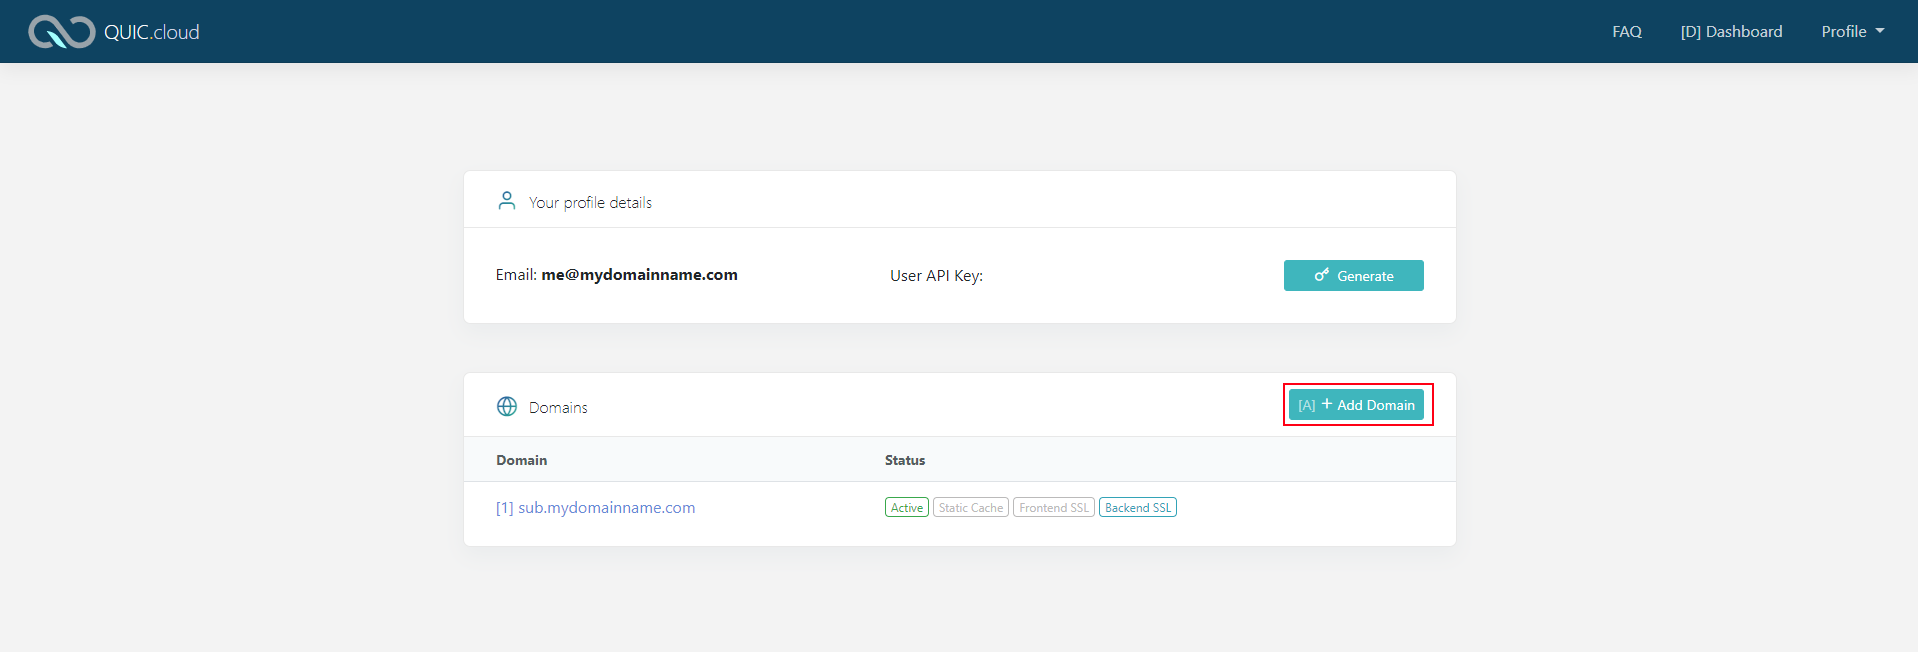
Note
This domain should be the domain that you configured the DNS for in DNS Preparation. If you are using a subdomain, such as
www.example.com, the domain added here should bewww.example.com.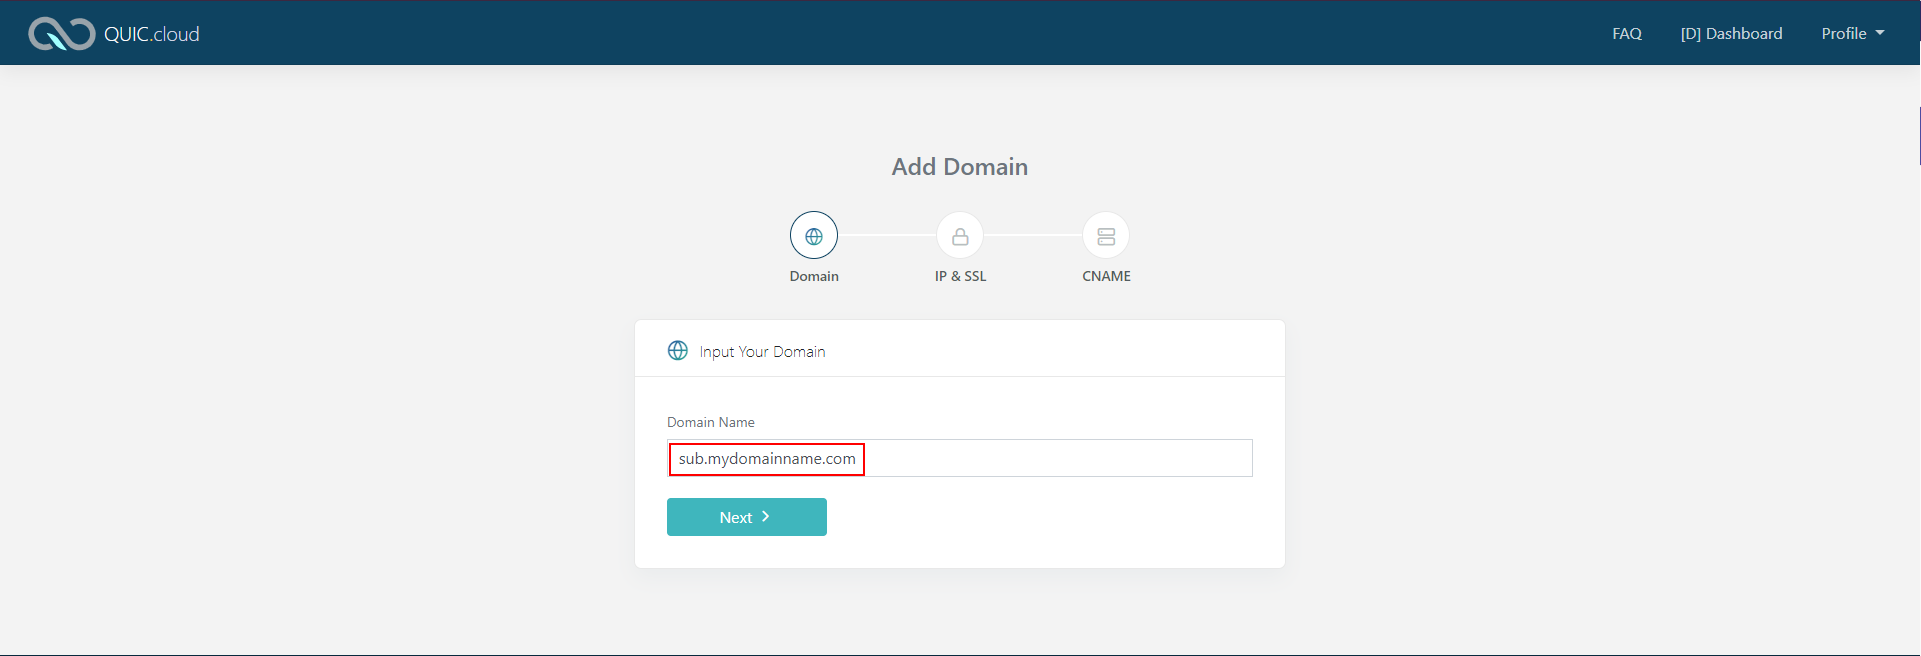
-
On the next page, verify the Server IP. This IP should be the origin server IP. If it is not, there is something wrong with your DNS configurations. Click the Dashboard button in the header to return to the dashboard, then verify that your DNS is set up properly and try this step again.
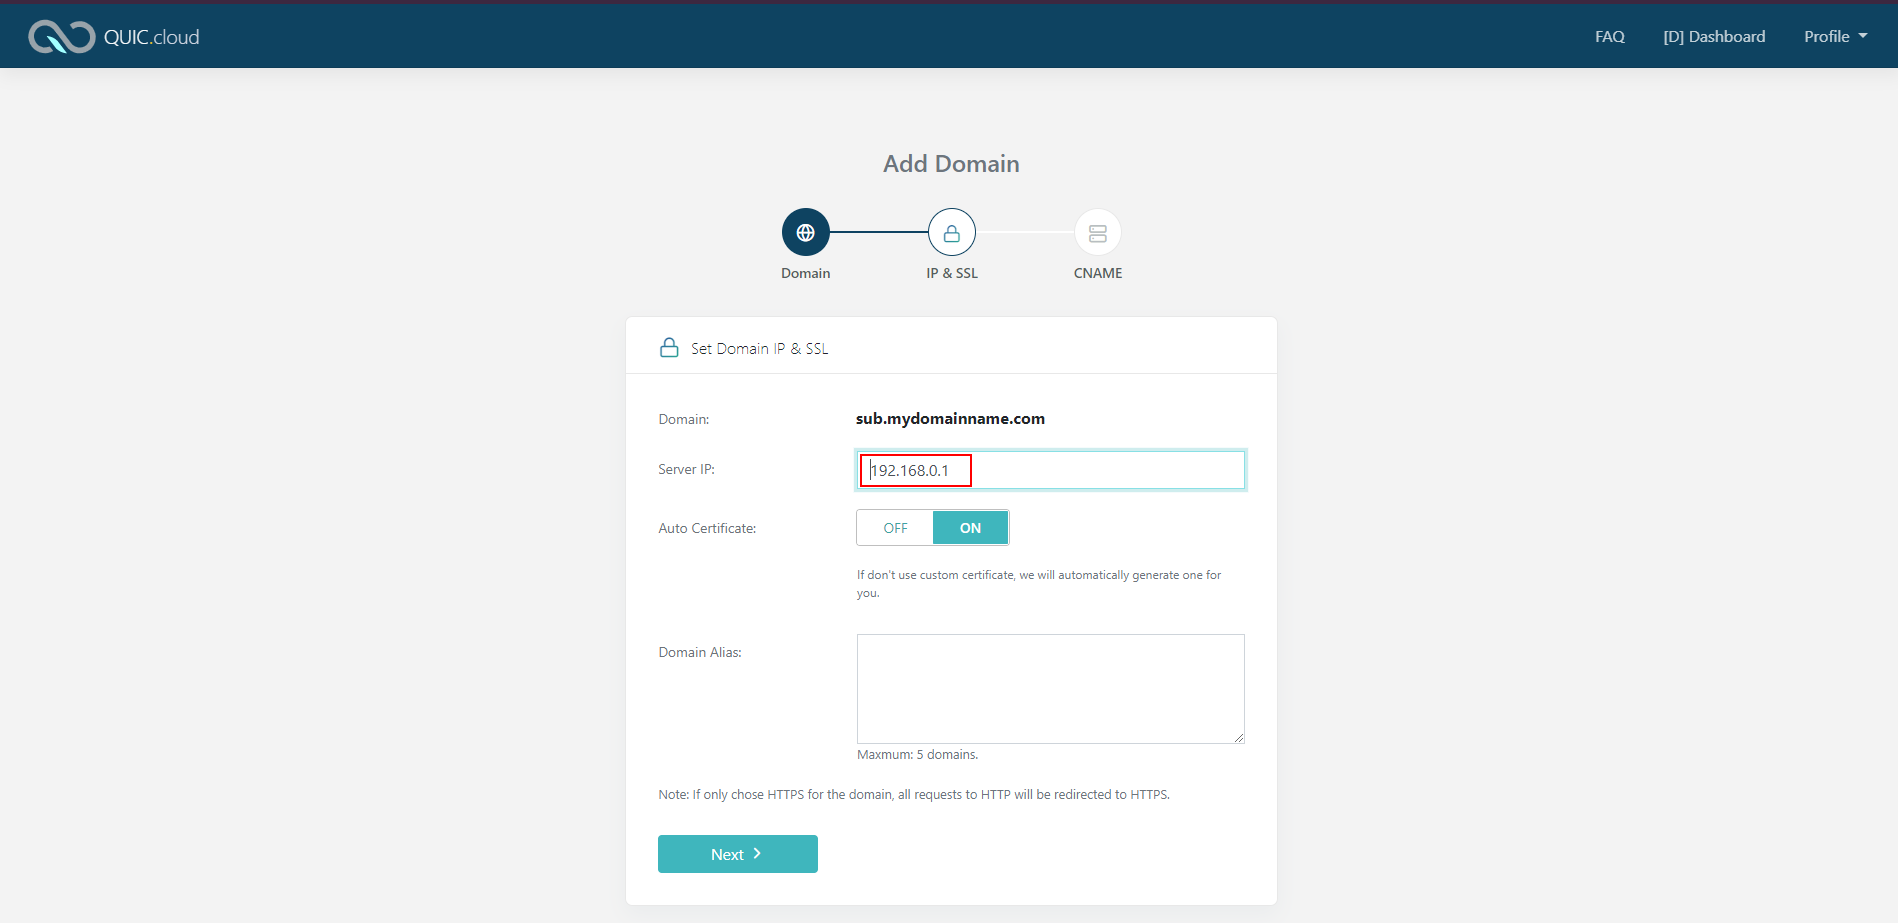
If the server IP is correct, configure the rest of this page.
Auto Certificate: If you wish to use your own certificate, set this to 'OFF'. Input boxes will appear for you to populate with your certificate information. If left on 'ON', QUIC.cloud will generate and manage the certificate automatically.
Domain Alias: These are aliases that you wish to attach to QUIC.cloud for the same site. The root domain andwww.do not need to be added, they are set by default. -
Click Next to complete adding your domain.
Step 3: Configure Access for your site
In the Domain Management Page, in the General tab, there are three options that configure how the browser connect to QUIC.cloud and how QUIC.cloud connects to your origin server. Select the appropriate options.
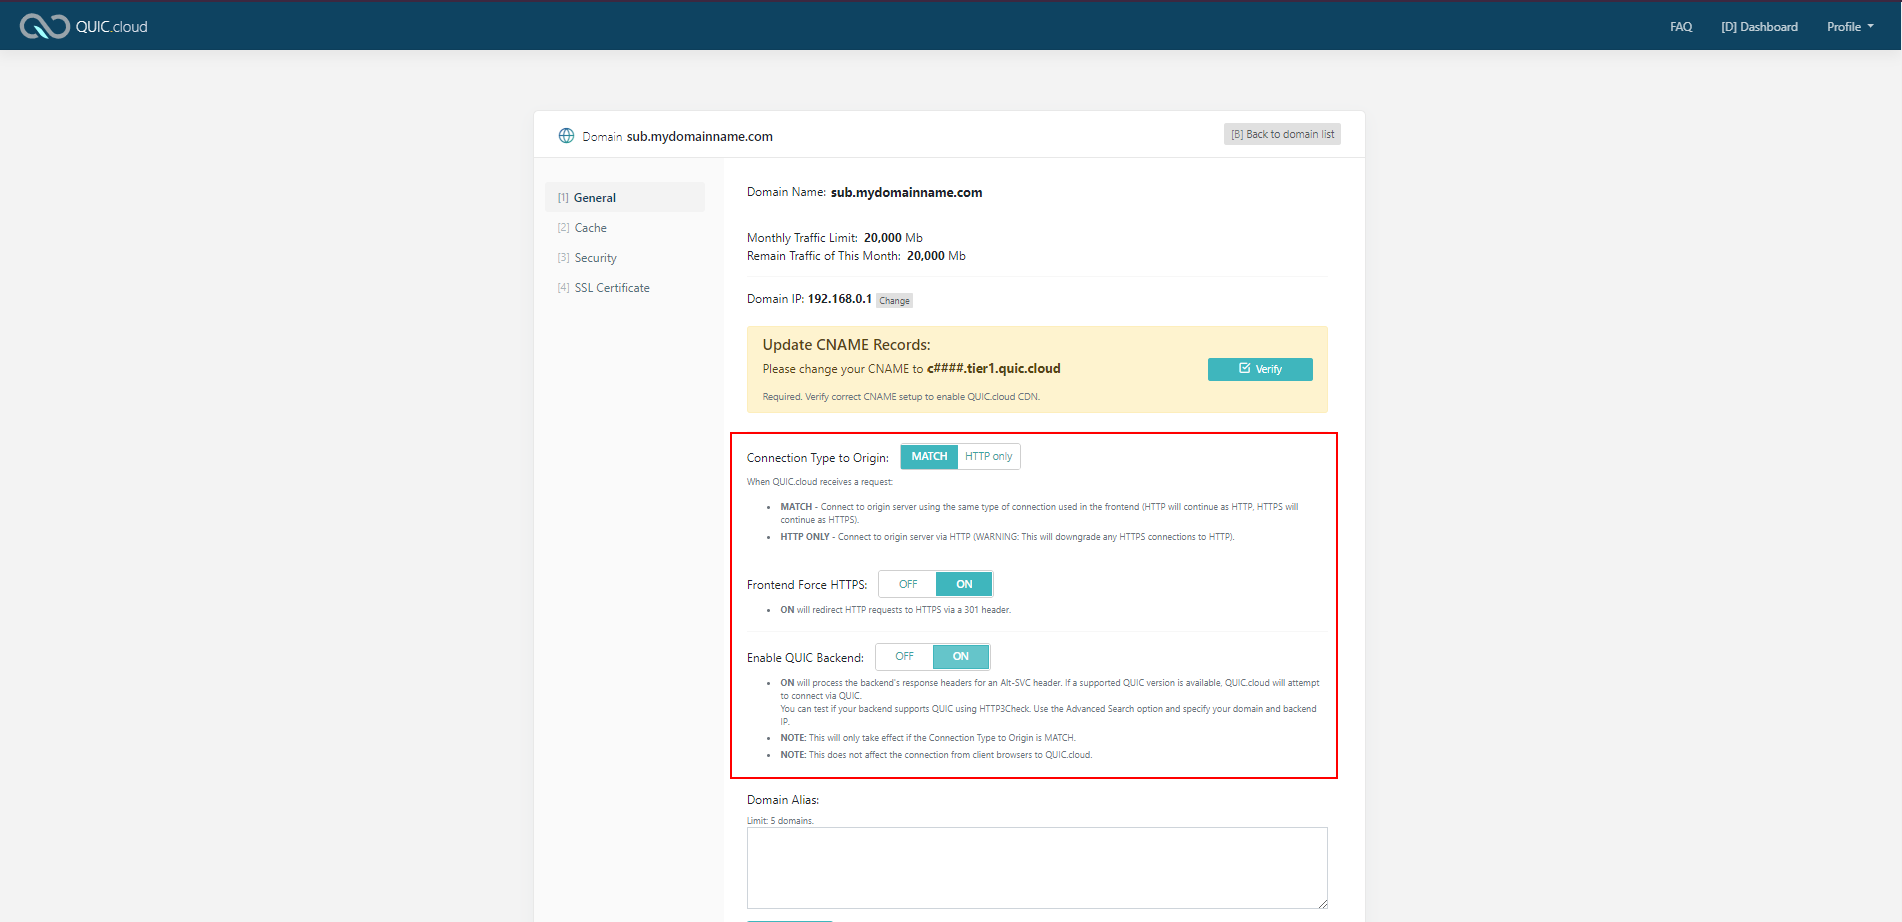
Connection Type to Origin: This option specifies the connection type between QUIC.cloud and your origin server. The available options are: match the connection type from the browser to QUIC.cloud or use HTTP Only.
Frontend Force HTTPS: This option specifies the connection type between the browser and QUIC.cloud servers. If set to ON, HTTP requests to QUIC.cloud are redirected to HTTPS automatically. Otherwise, both request types are forwarded to your backend server (depending on how Connection Type to Origin is configured).
Enable QUIC Backend: If your site offers QUIC and/or HTTP/3, you can try this option. This will let QUIC.cloud servers attempt to connect to your origin server using QUIC and/or HTTP/3.
Configure your Firewall
When your site goes through QUIC.cloud servers, all the requests will appear via QUIC.cloud IPs. This will likely trigger some firewall rules. Make sure to whitelist QUIC.cloud IPs so that the requests do not trigger the firewall.
Step 4: Configure QUIC.cloud API for Wordpress Users
One of the very special features of QUIC.cloud is that it allows full-page caching with support for automatic purge on CDN via the LiteSpeed Cache Plugin for WordPress. This step is strongly recommended for all WordPress, WooCommerce and bbpress users.
To use this functionality, you first need to generate an API Key: In your my.quic.cloud Dashboard, click on the option Generate API Key.

Tip
Do not share your API key with anyone else! Treat it like a password.
Once the API key is generated, visit your WordPress Admin Dashboard, and navigate to Litespeed Cache > Settings > CDN.
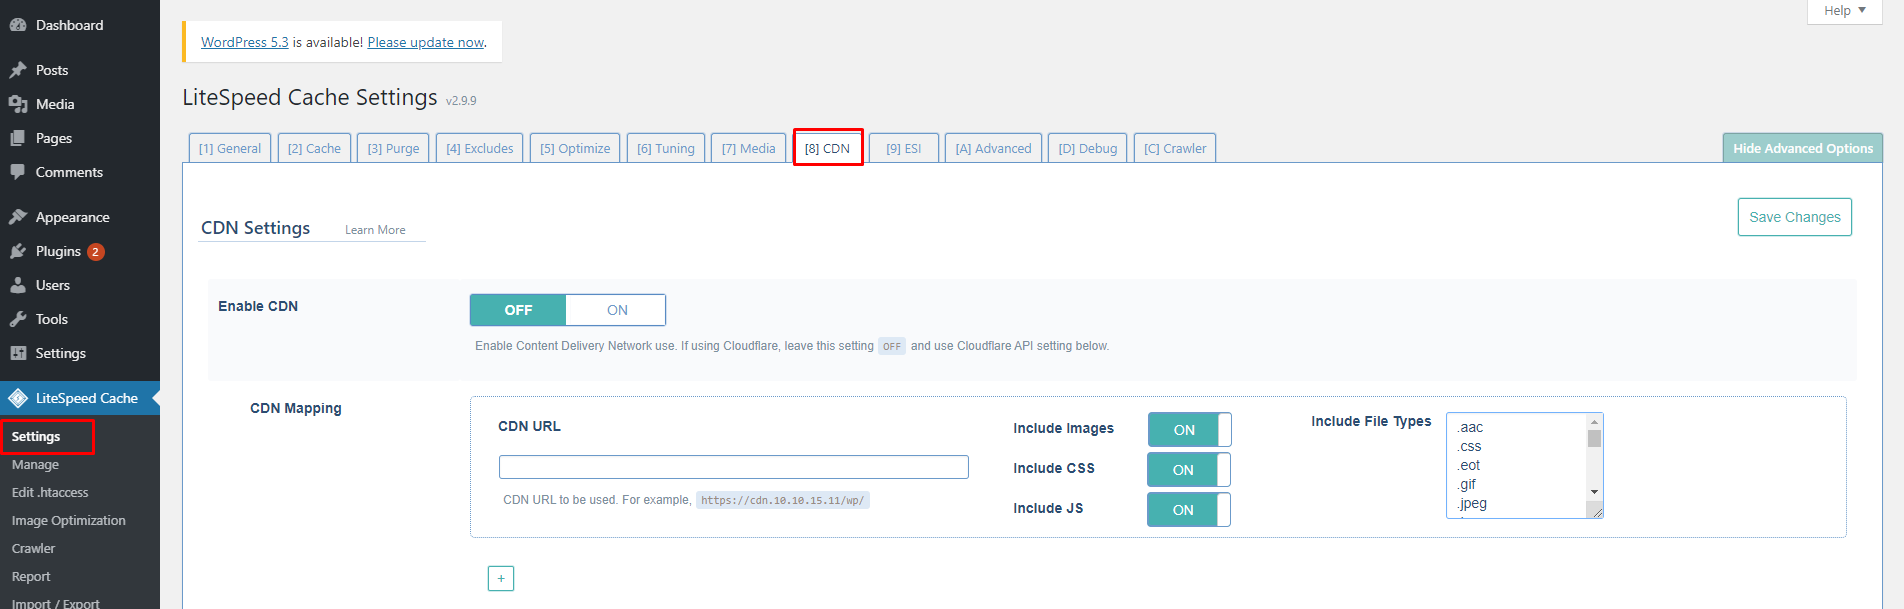
Tip
If you don't see a CDN tab on your Settings screen, click the Show Advanced Options button to the right of the visible tabs, and it should appear.
Set QUIC Cloud API to ON. (If you don't see that option, make sure you have updated LSCWP to at least version 2.9.7.)
Enter your QUIC.cloud Email Address and User API Key, and click Save.

LiteSpeed Cache for WordPress is now ready to accept QUIC.cloud.
Step 5: Configure DNS Records and Verify
Update the DNS Manager
Note the CNAME record that we created for you, as below:
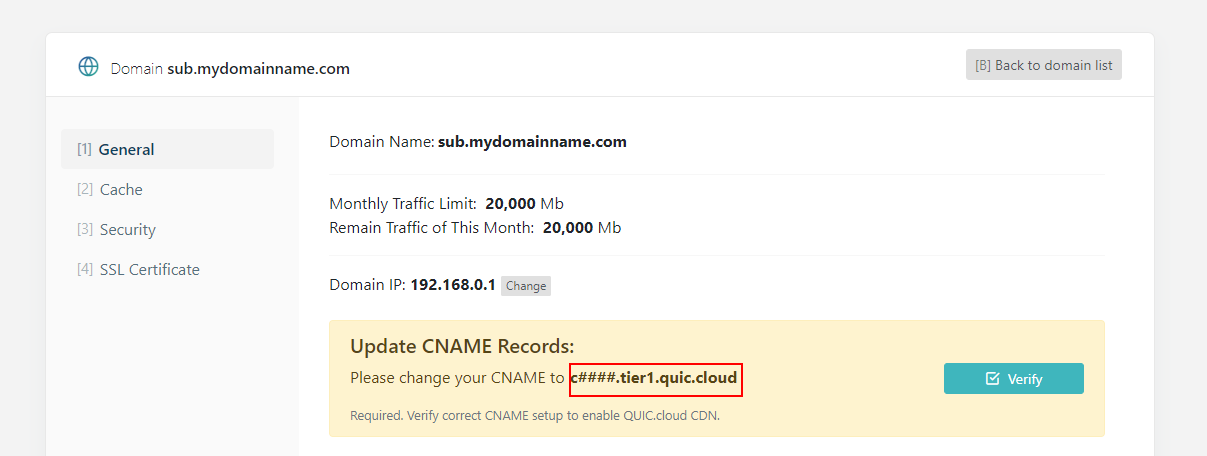
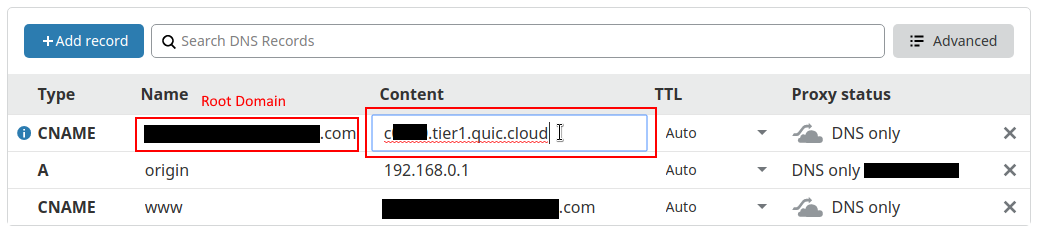
In your DNS Manager, change the CNAME you set up in step 0 to point to this CNAME domain.
Digital Ocean DNS Example:

CloudFlare DNS Example:
At this point, nothing should have changed. Your site should still target your server. Here are some ways to test.
Verify
Once you have confirmed your changes, navigate to your my.quic.cloud Domain Settings Page, press the Verify button.
The verify button will test and attempt to switch your domain to use QUIC.cloud servers. If Auto Certificate is enabled, this will also attempt to generate an SSL certificate for your site. This step will take up to two minutes to complete. During this time, your site may be inaccessible. Perform this step at an appropriate time.
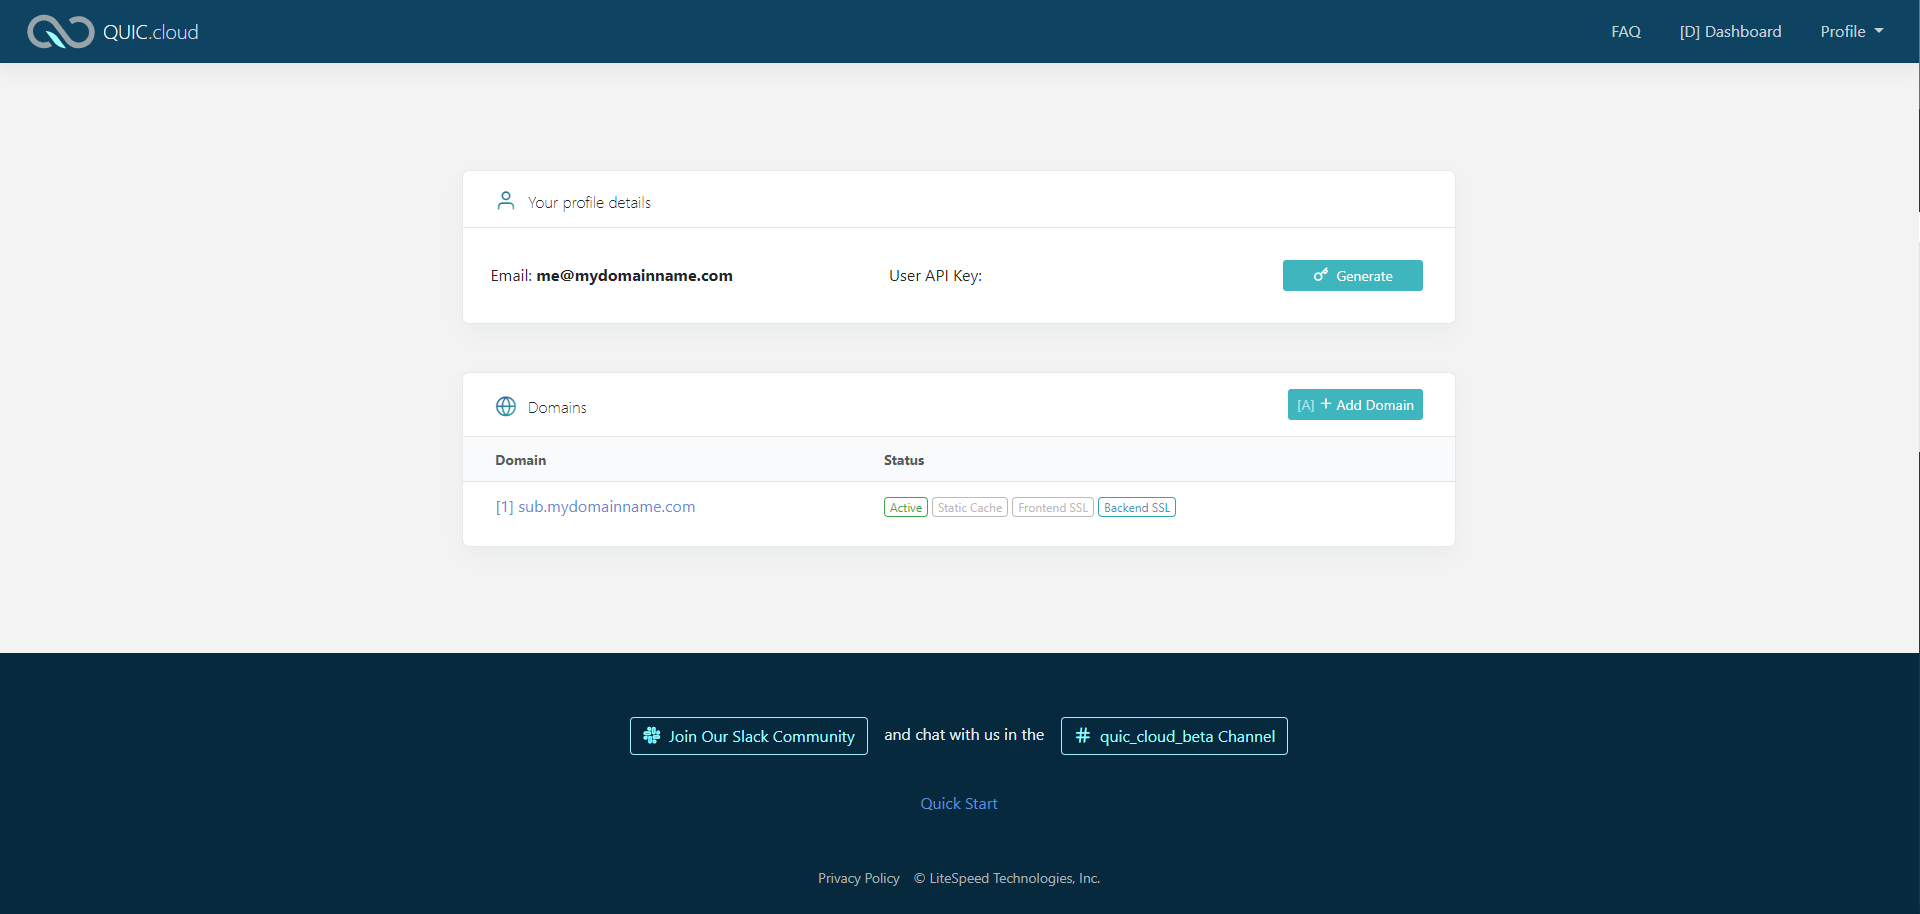
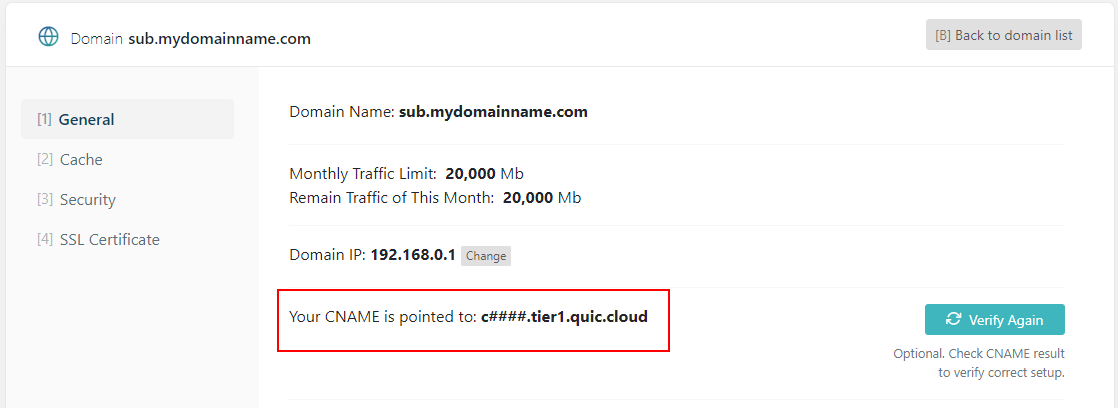
Wait a couple minutes and refresh the page. If your site verified properly, it will look like the below screenshot:
If it did not verify correctly, there are two main possibilities:
- You have a long TTL that did not expire.
- There is something misconfigured in the DNS. Verify that the DNS is prepared correctly and that you changed the correct entry.
Congratulations! Your site is now running on QUIC.cloud! You can click around to test the various features available to you.
Verify Your Website is Using QUIC
You must have a valid SSL Certificate set up on QUIC.cloud to use QUIC.
If QUIC.cloud is working properly, your site should be using QUIC. You can use a browser extenstion to verify this, such as this for Google Chrome. It will show a Green lightning bolt indicator, if your website is using QUIC.

Alternatively, you could use HTTP/3 Check to test it out.
Frequently Asked Questions
How do I check my DNS settings?
There are multiple tools to check DNS settings. Note that if you see a CNAME result, check to make sure that it matches your expected target.
-
The simplest way to check your DNS setting is to ping your domain. Ping your domain from the Windows command line or Linux SSH terminal

Tip
To see if your domain is on the QUIC.cloud network, check that the IP address matches a QUIC.cloud IP or compare it to the ping results for the CNAME record assigned to your domain (e.g.
c123.tier4.quic.cloud) -
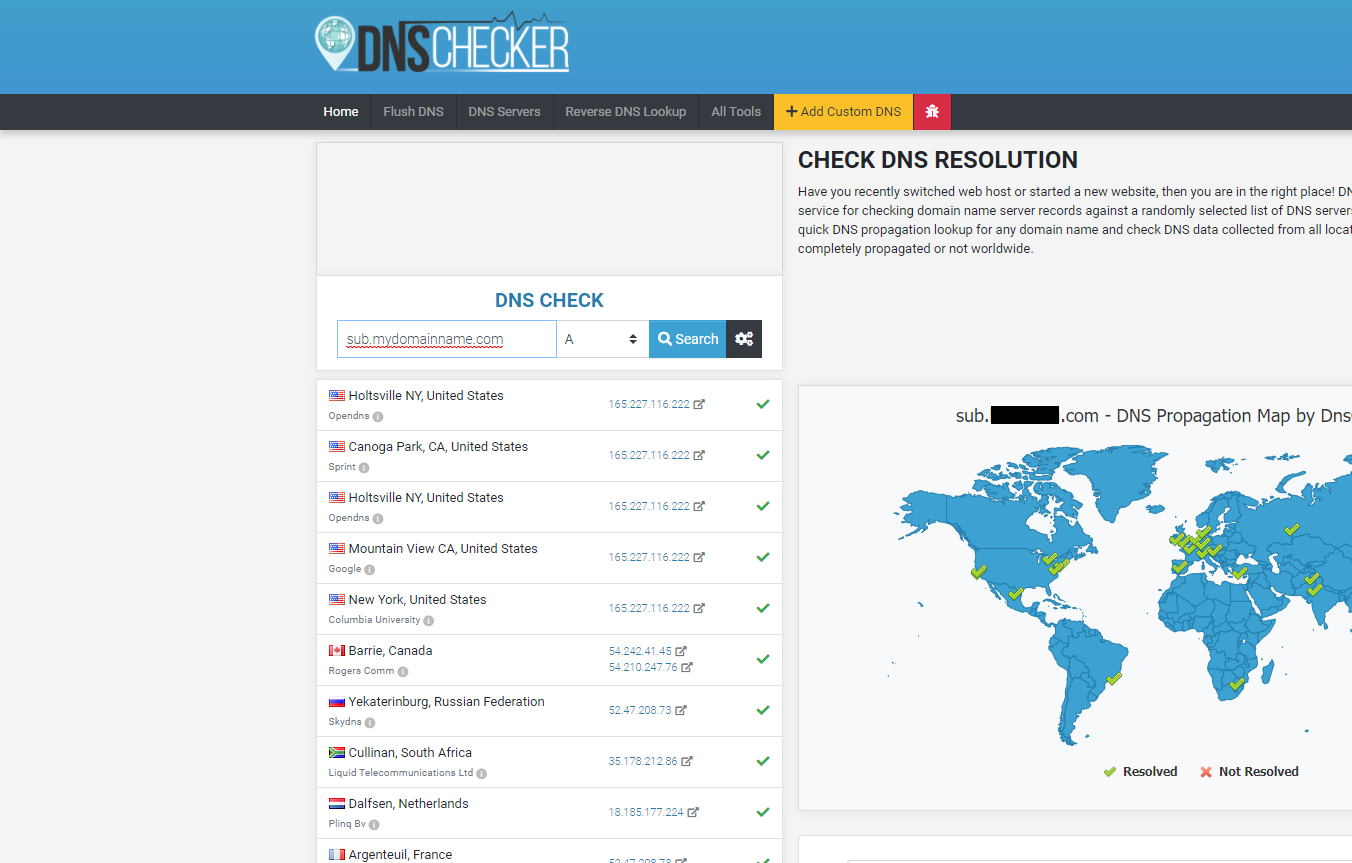
Use the online DNS checker tool. If you see different IPs listed globally, that means the site is on our CDN network.
-
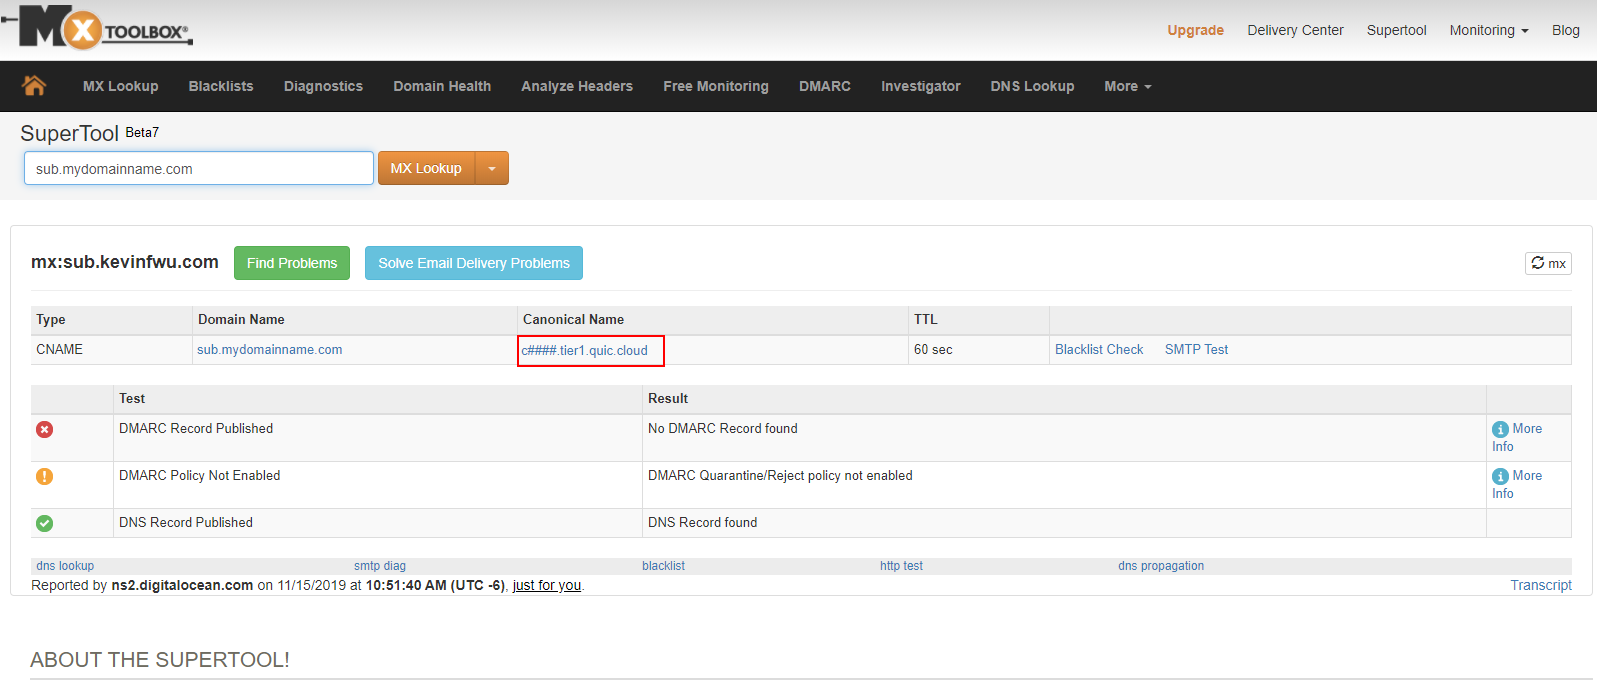
Use the MX toolbox. If you see different IPs listed globally, that means the site is on our CDN network.
How do I handle an Invalid Error Certificate?
If you see an Invalid Certificate issue, go to the QUIC.cloud Domain Management page, and click Generate Certificate to set your certificate. If you are using your own SSL, Please ensure that it is valid.
My website isn't using QUIC, what should I do?
If you have verified your domain from inside the CDN's Domain Management Panel, it is most likely that the DNS has not yet propagated. Wait a while and check again. If it's still not working, check if your browser has QUIC Support.
If you're unable to verify your domain, ensure that your DNS records are set correctly